 Click to enlarge.
Many of the tillandsia species we collect naturally grow epiphytically; they therefore do not grow as one would expect a typical plant – with a pot and growing media. Attached to a mount displays them in their most natural form. Their ability to grow without soil is one of their most unique and fascinating attributes, which sets them aside from most other plants.
The way a tillandsia is mounted may enhance or detract from the plant’s appearance - enhancing is what we aim to achieve. This is one of the most important aspects of displaying your plants successfully. It is achieved by maintaining a visual balance between the plant and the mount, with each complementing the other.
Depending on with whom you speak, there are as many methods and materials for mounting tillandsias as there are collectors. Depending on what is available to you, and what you expect from the appearance of your plants, will determine generally how you will undertake the task. Every collector has their preferred method; it’s just a matter of finding a method which suits you and your plants.
Generally, the task involves three components – the plant, the mount and the method by which the two are attached.
The Plant.
Tillandsias vary greatly in habit and it is these characteristics which generally determine the size and shape of the mount required.
There are generally three plant stages which you may be working with:
1. seedling or adventitious offsets;
2. mature seedling (A seed grown plant which is advanced in its developmental stages, but not yet reached dimensions of a typical offset or mature plant.) or offset (pup) and
3. mature plant/clump.
When a tillandsia is purchased, you are most likely to receive a mature seedling or offset.
Seedling/adventitious offsets are generally grown in larger numbers on one mount, while your typical mature seedling/offset and mature plant would generally be grown singly, or depending on the size of the mount, in small numbers together (colony).
You would generally need to ask yourself, “Is the plant to remain permanently on this mount, or is it just a temporary mount?” If you are mounting a typical offset, you need to visualise the mature size of the plant or the size of the clump in several years’ time. If you are familiar with the plant, you can generally determine the stage of its lifecycle the plant is at - if the plant is a recent offset, you know it will be a single plant for possibly some years, if the plant is flowering you know you will soon have offset/s forming and a clump developing, whereby additional space on the mount is soon required.
Another aspect to consider is the habit of the plant – tall and thin or short and broad. Tall and thin plants generally suit narrow mounts, while short and broad plants generally suit broad mounts. It is also helpful to be familiar with the shape of the plant when flowering. Some plants may be broad, but produce an inflorescence with a long scape, thus better matching a correspondingly shaped mount.
The Mount.
The range of mounting materials is almost endless: driftwood, tree branches, cork, bark, timber off-cuts, rocks/stones, shells, etc. Different people prefer different materials – cost, availability and personal taste are generally the determining factors.
Generally, it does not make much difference what the mounting material is, as long as it is not toxic. This includes natural toxins such as accumulated salts in ocean driftwood, or phenol/terpene/tannin leachates from some fresh wood/bark – aging and soaking with fresh water usually removes natural toxins. Do not use treated timber, as these are impregnated with a copper solution (CCA - Copper Chrome Arsenate), which is very toxic to tillandsias - this also includes the wax treated wood products. Also, avoid painted/stained timbers or materials whereby leachates may be produced. Attempts should be made to maintain the mount as natural as possible.
The material should not hold water for an extended period, nor should a hole or depression be created where water will collect and persist. If a hole or depression is desired, drill a hole right through the timber at a downward angle. Water must always drain freely from the plant and mount.
The mount should also be long lasting with a relatively roughened texture for roots to adhere. Roots may not properly adhere to a smooth and shiny surface, with the plant possibly falling away if/when the bonding material eventually fails.
Mounting materials should be light in weight as most are intended to be hung. However, this most likely depends on the strength of the material which supports all your plants. Remember, one plant and mount may be light, but many can be very heavy.
Mounts can come in a diverse range of sizes and shapes, depending on the material chosen. The mount for your selected plant should provide balance between it and the plant/s, and space to accommodate the natural mature shape.
Remember, you are looking for a material that will complement the plant, not detract from the plant.
Method of Attachment.
Again, there are many different methods and materials for attaching tillandsias. However, it can generally be divided into two broad categories: glues and ties.
Glues.
The number of suitable types of glue on the market is rather large; it is just about finding one which you prefer. However, the most important aspect is to obtain one which is non-toxic to the plant. There are probably more non-toxic than toxic glues on the market; however, it is always good to use a tried and trusted product.
Some product examples include Kwik Grip, Gel Grip, Construction adhesives (Liquid nails, MaxiBond, Weldbond), Tarzan’s Grip, Super Glue, Gap Filler, hot melt glues (use with caution), contact cements, sealants, Shoe Goo, etc.-- it’s endless.
Most collectors will trial numerous products depending on what is available to them in their local area and is most cost affective. However, it is initially often trial and error.
One would expect the glue selected to be quick drying; however, this sometimes depends on the time of the year it is used. As some of the solvent- based construction adhesives may take up to a week or more in winter to cure, some people may consider this as a disadvantage.
The glue needs to have the bonding ability for the material chosen, such as wood and plant tissue and be long-lasting. It must be unaffected by water and fertiliser, without its composition altered by moisture, temperature or light.
Glue which remains firm when first applied is best, as runny or stringy glues can become rather messy. The glue should also blend in with the display - neutral or clear colour seems most appealing. Bright coloured glues can often detract from the appearance.
Most importantly, only use the minimal amount of glue which is required to achieve the bond. The plant and mount should be the object of display, not a blob of glue.
When using glue, attach to the stem or the base of green leaves (leaf sheaths). Avoid attaching to the base of dead or dying leaves (old leaves) which may cause the plant to prematurely fall away from the mount before roots are produced (if produced). Also, if using hard-setting glue - particularly for the small rosetted forms - avoid using too much around the plant base, which may restrict root development.
Also, one of the most important points of consideration is besides being non- toxic to the plant, is to be non-toxic to you. Glues should always be used where air circulates freely, with enclosed areas avoided. I have personally used glues which are typically high solvent based which have given me terrible headaches after each use - maybe I am just more sensitive to certain chemicals than other people. Nevertheless, some of the chemicals present in these glues are extremely harmful and can certainly have a detrimental affect on our health in the long term.
I have often heard many discussions on the use of sealants, more precisely Silicon sealant. Over the years I have read and heard many people say not to use Silicon as it will kill your plants. However, it was often just hearsay – not from personal experience. I would always question how or why it kills the plants, but no answers could be provided.
(*Ed. Silicon Sealants used to release acid while curing, most are available in Neutral-Cure versions now.)
I personally tried silicon a couple of years ago on several species and these plants are still thriving today. Personally, if I relied upon this trial, I would say it is fine to use. However, I stopped using it in case there may have been some truth in this and as there are plenty of other alternatives available.
I recently spoke with a manufacturer of the product, which left more questions than answers. However, one very interesting point they raised was that when curing, some are neutrally curing and some are acidic curing – being a bi- product which generally washes off once cured (type is stated on the product label).
Although, as advised by Robert Smythe (personal communication), the by-product once cured is only vinegar, which is generally considered safe to use and silicon is the second most abundant element on the earth’s surface – which is already readily available. It is also very unreactive, therefore lasting many years without breaking down. Robert further stated that Silicon adhesives should be perfectly safe to use, though it would be suggested that they be well washed once cured.
However, due to the large number of suitable alternative glues available, I would recommend to stay with the tried and trusted brands.
Ties.
These include materials such as cable ties, PVC coated wire, fishing line, nylon stockings, garden tie, string, budding tape, etc. Again, the list is rather extensive.
When choosing a tie material, select one that is strong and long lasting - this includes resistance to sunlight, as to provide sufficient time for roots, if produced, to establish. It should not loosen or stretch with age, therefore little to no elasticity seems to work best. Nylon stockings once pulled tight seem to have little stretch remaining. The tie should not be bulky looking, as it should blend in - neutral colours often assist with this too. The material should also be cost affective.
When selecting a wire, obtain one which is PVC coated to prevent contact with the copper wire and plant – using straight copper wire may kill your plants. Also, caution should also be taken with galvanised wire; new galvanised materials have been known to have an adverse affect on the plants. However, old weathered galvanised materials seem not to have the adverse affect.
The gauge of the wire/material should not be too thin as damage may result by cutting into the plant. Caution should also be undertaken when attaching the plant as to not over-tighten the tie – this can crush or even sever the plant in two.
When using wire, don’t insert too low around the plant base--particularly taller plants which may be top heavy when flowering as the plant may fold down. Conversely, don’t insert too high either which may damage the apical meristem.
Generally, glues are used for smaller plants and ties are used for larger plants. However, some prefer glue for all or a combination of glue and tie for larger plants.
General.
Once the plant, the mount and method of attachment has been chosen and determined, several further points may be considered.
1. Where to position the plant on the mount – The plant will generally always look best situated approximately 1/3 up from the base of the mount. This position provides balance and is most aesthetically pleasing.
2. Single plants or in groups – This is generally determined by the size of the plant and/or mount. Generally, larger growing species are most appealing as single specimen plants--e.g., T. Xerographica. Smaller plants can certainly be further enhanced by a colony display. When displaying in colonies, stay with the same species for each mount - this looks most natural. Single plants should be aligned along the medium axis, while colonies should have each plant offset to one another. Placement distance between each should be varied also and the number of individuals within a colony look best as odd numbers--i.e., 3, 5, 7, etc. When using three, they seem to look best with two situated within the lower half and a single at the upper half of the mount. Furthermore, if the plants to be positioned on the same mount vary in size, have the largest at the bottom and smallest towards the top - remember balance is the objective.
3. Don’t rush – Always place the plant or plants on the mount first before attaching – stand back and adjust. Once satisfied with the placement, go for it!
4. Which direction do I place them? - The growth habit of the plant itself will tell you. Always attempt to place them in the same orientation as they had previously been positioned. Tank-type species should be attached vertically so the tanks can fulfil their water impounding purposes. While some tillandsias will grow in any direction (i.e., ageotropic—for example, T. bulbosa) so they do not need to be grown upright like most other plants. These can be hung upside down, sideways - any angle is fine. Some species such as T. atroviridipetala and T. magnusiana should be positioned horizontally due to their susceptibility to rot when water accumulates within their leaf axils.
5. When should tillandsias be mounted? - There is no special time to mount tillandsias - they can be mounted any time of the year. However, growth will be greatest during the warmer, longer day lengths – being the predominating stimulus - the plants will establish roots and attach to the mount much quicker during the growing season. Additionally, humidity is the key to vigorous root development.
6. When attaching more than one plant to a mount, it is always a good idea to work from top to bottom. This prevents possible leaf damage of the plant below when drilling or attaching the proceeding plant. The leaves of the plant below can then safely be placed over the plant above.
7. Avoid positioning your plant on a flat or horizontal surface where water cannot drain away freely. Any accumulation of water for a period may be detrimental – this most often occurs through the winter months where the plant base and apical meristem rots and the plant suddenly dies.
8. One last point to remember before attaching the plant is to attach a hook. This will enable the mount and plant to be hung. Use a heavier gauge wire which will adequately support the weight. Expect the weight to increase if the plant/s is to be left to clump. Always position the hook towards the top of the mount situated along the medium axis. If the strength of the hook doesn’t seem sufficient, don’t be afraid to attach two hooks. There is nothing worse then finding your plant and mount face down on the ground.
My Method:
I use two types of mounting materials and two methods of attachment:
Mounts.
1. Driftwood is used for my own personal collection. This is a more natural looking material and provides a wonderful display. One of the greatest aspects about driftwood is that they come in every shape and size. I have yet to find a plant which cannot be complemented by a piece of driftwood.
2. Cut up fence palings are used for plants which I am selling. This is free and easily obtainable. Generally a more disposable material is chosen.
Method of attachment.
1. Glue (non-silicon clear sealant) is used for all seedlings, mature seedlings and small plants.
2. PVC coated wire - telephone wire (2 core/0.5mm PVC) for most and detonator wire for very large/heavy species.
Some advantages and disadvantages I have experienced with my preferred mounting strategies:
| Telephone wire for most plants |
- Able to hang as soon as mounted. - Able to manipulate in and around leaf sheaths to hide wire. - Comes in green or brown to further disguise wire. |
- May come loose during windy weather (particularly caulescent species)—just needs re-tightening with a pair of pliers. |
| Clear sealant |
- Clear and blends with plant/mount - Plant can be easily peeled away without damage (if roots haven’t grown), which provides the option to relocate to another mount if desired—as opposed to glue. - Does not restrict root growth—stays flexible/soft and does not set hard. - Can do a large number very quickly |
- Needs to dry overnight in summer and at least 5-6 days in winter. |
Click to enlarge.The driftwood should be soaked in fresh water for a couple of days before use to eliminate any salts present--at least one water change should be attempted. However, with the local water restrictions I found this very wasteful and I now just stockpile the pieces on the roof of the garage for several months before use, which is washed many times by the rain. This seems to remove any salts which may adversely affect the plant and also sun-bleaches the wood which further enhances its aesthetic qualities.
STEP BY STEP GUIDE.
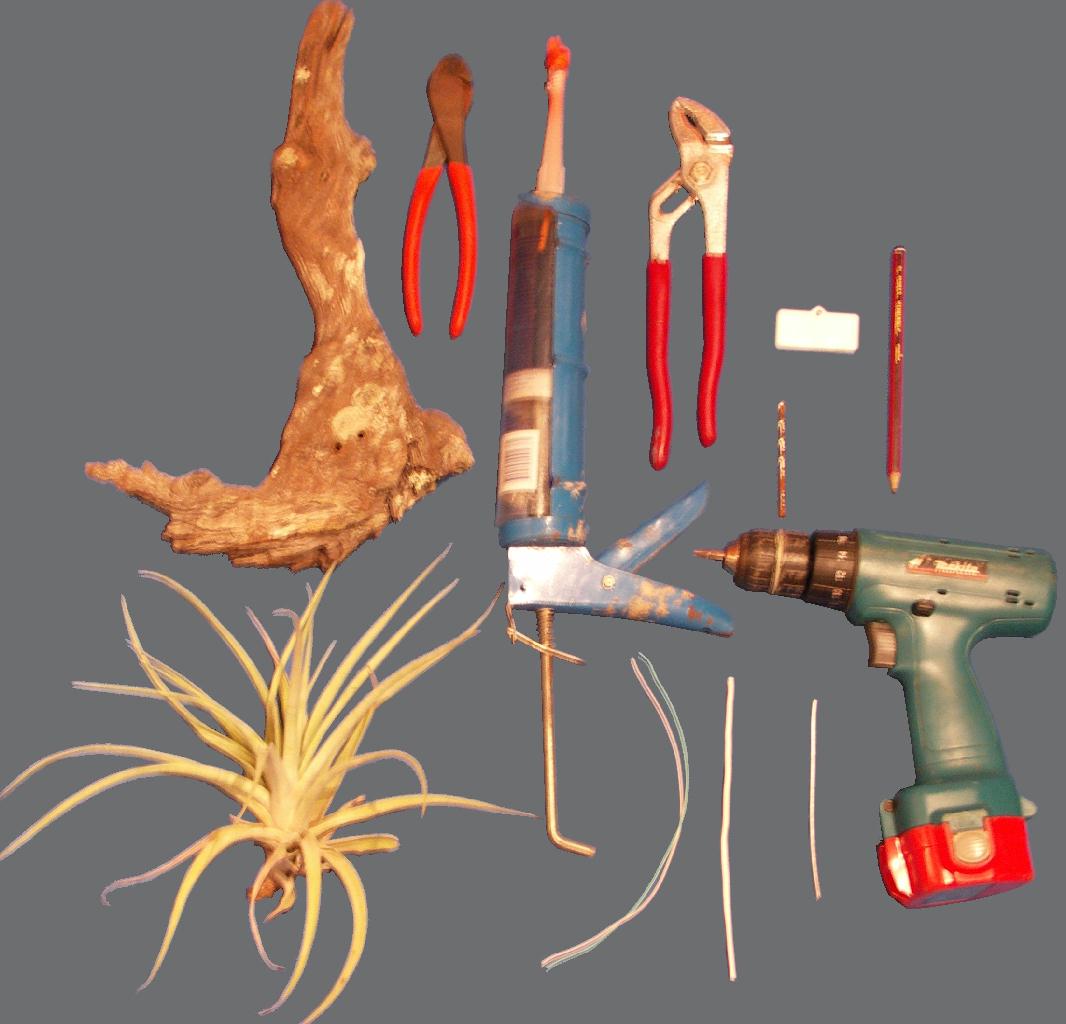
Equipment required
- Cordless drill with 4mm drill bit and Phillips head attachment.
- 1.5mm and/or 2mm galvanised wire
- Pair of pliers and cutters
- PVC coated wire and/or clear sealant
- Plant label, 6B pencil and stainless self-tapping screws
- Plant
- Mount: driftwood or cut up fence paling.
 Click to enlarge.
Driftwood using wire.
1. Choose a piece of driftwood which best suits the plant habitat.
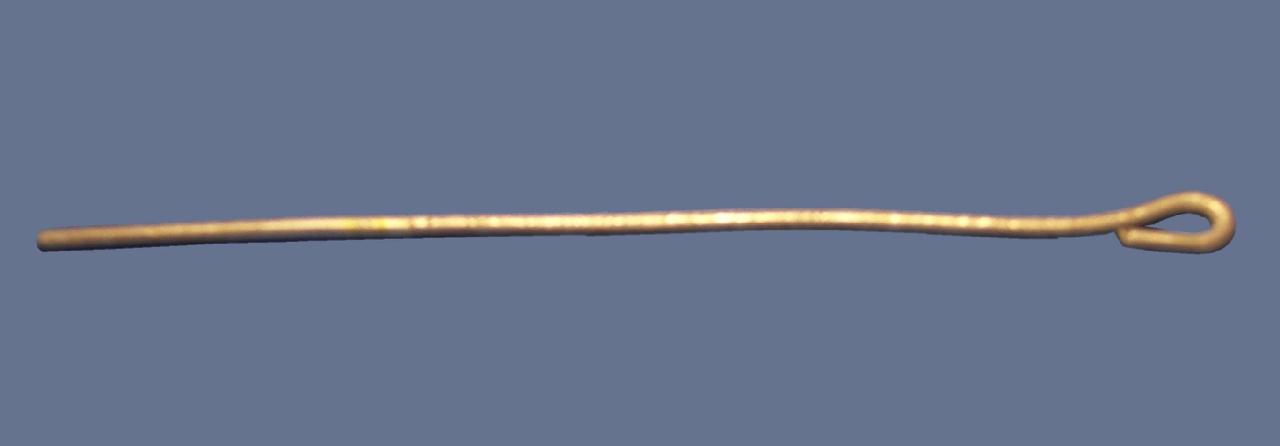
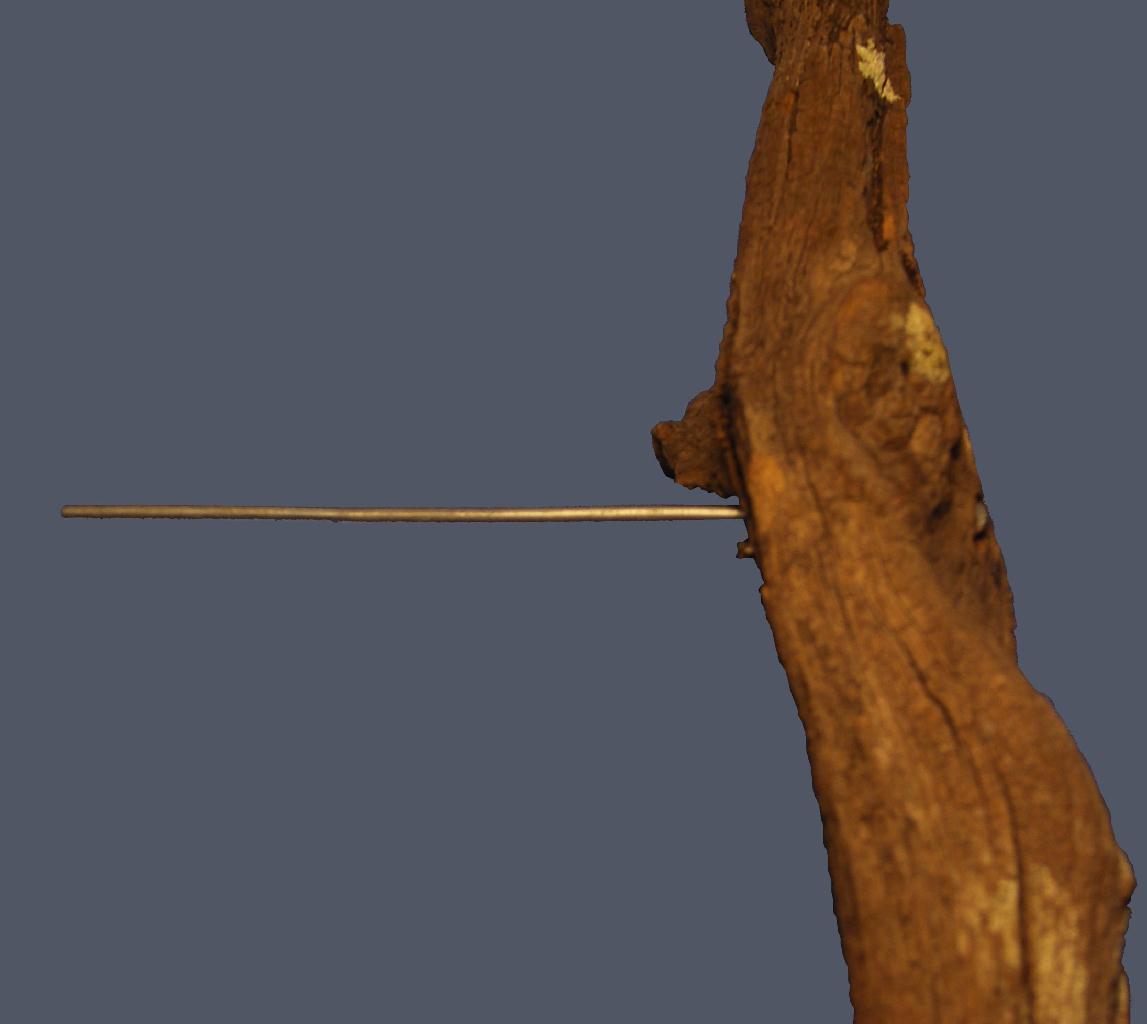
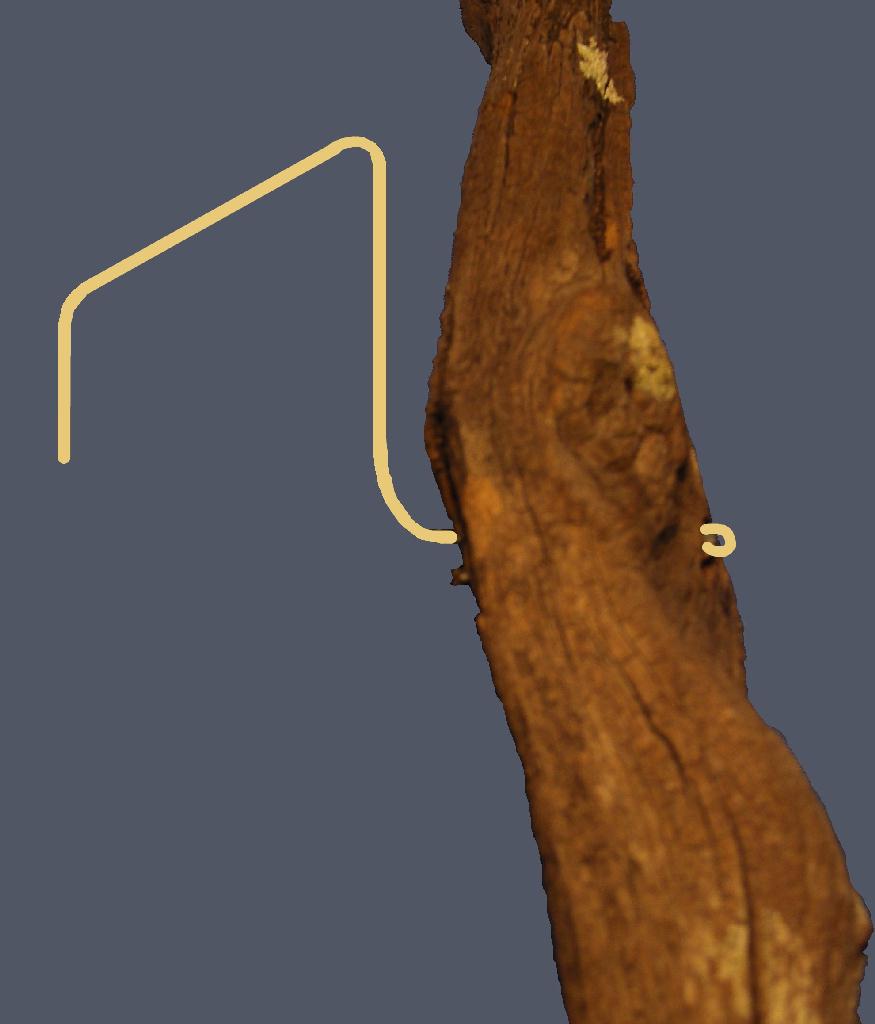
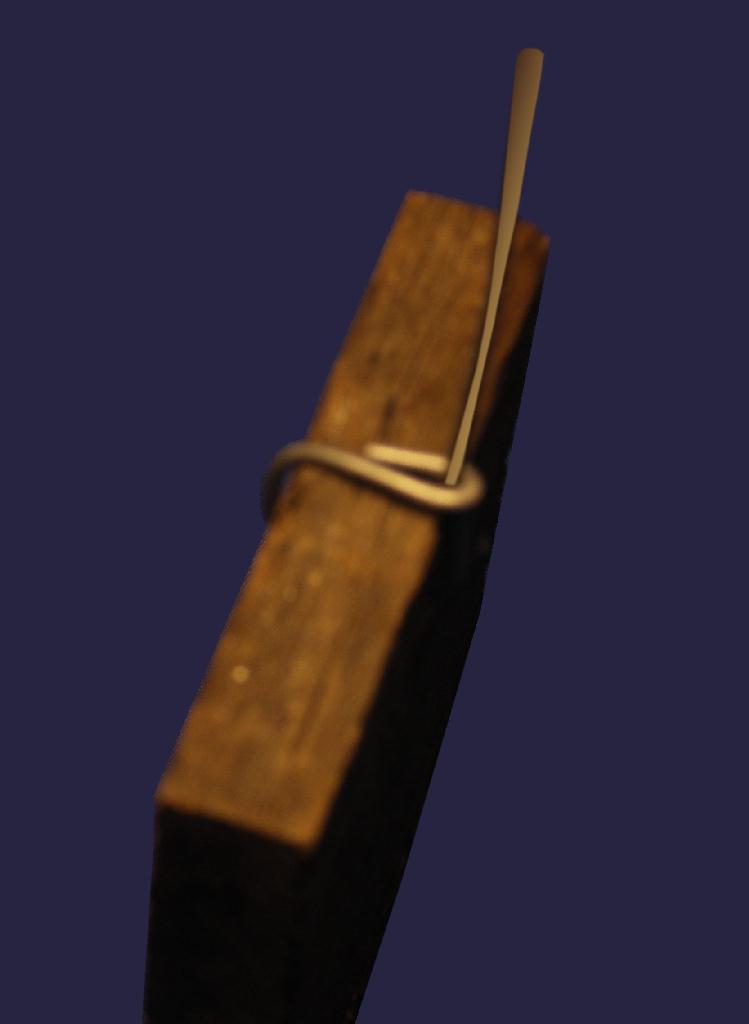
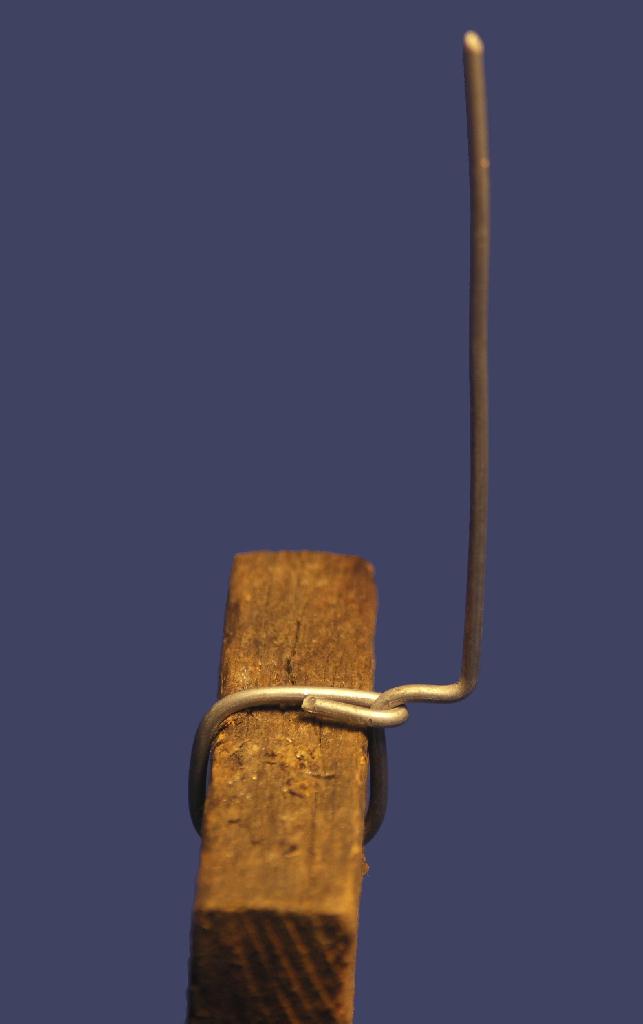
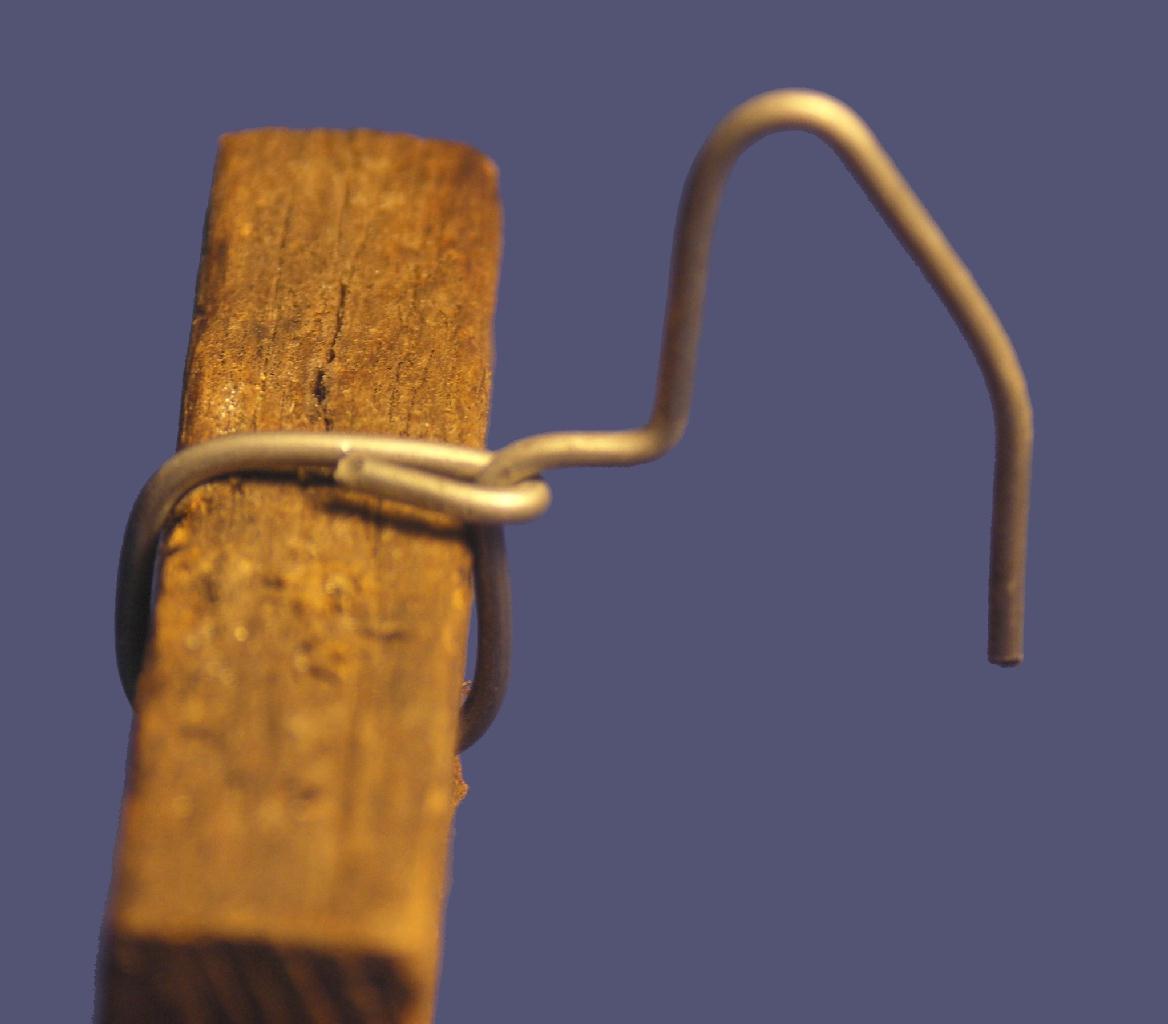
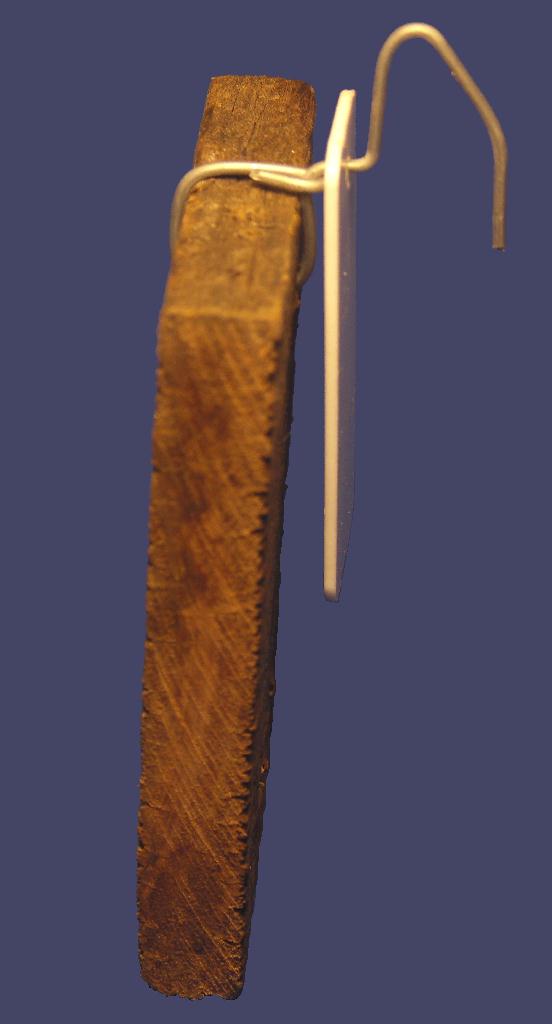
2. Drill a hole through the mount at the top to support the hook. Position the hook along the median axis so the mount hangs straight. A mount leaning to one side is like looking at a crooked wall painting. Use a piece of 2mm galvanised wire, approximately 100mm in length (depending on thickness of mount). Bend a 10mm length at one end over and squeeze together (Fig.3). Insert the wire into the hole with the bent end facing the front of the mount. Pull through and tap if necessary to have the bent end flush with the mount surface (Fig.4). With a pair of pliers bend the wire 90 degrees up at the back of the mount. With a 30mm-40mm length, bend the wire over again away from the mount at a 45 degree angle. The last 10mm of the wire should be bent directly downwards, which further prevents the hook from accidentally slipping off the wall if knocked (Fig.5).
 . .
. .  . .
. . 
3. Place the plant on the mount first, to find the most suitable position. Once satisfied, remove the plant and replace with your thumb in the same position. Drill a hole either side of your thumb position.
4. Cut a length of telephone wire approximately 100mm to 150mm long. Determine front and back of the plant. Insert wire from rear of plant between leaf sheaths, partly encircling the plant and return out from the rear again. Push wire as low as possible down behind the leaf sheaths to hide. For species where the leaf sheaths are tightly clasped together, such as T. Butzii, etc., gentle persuasion with a piece of wire or similar while slightly pulling on each leaf is required – the wire is then gently manipulated down behind. When pulled through, the wire should be left longer on one side, which assists when trying to insert the wire into the holes. Insert the longer length into the first hole, then the shorter end into the second hole.
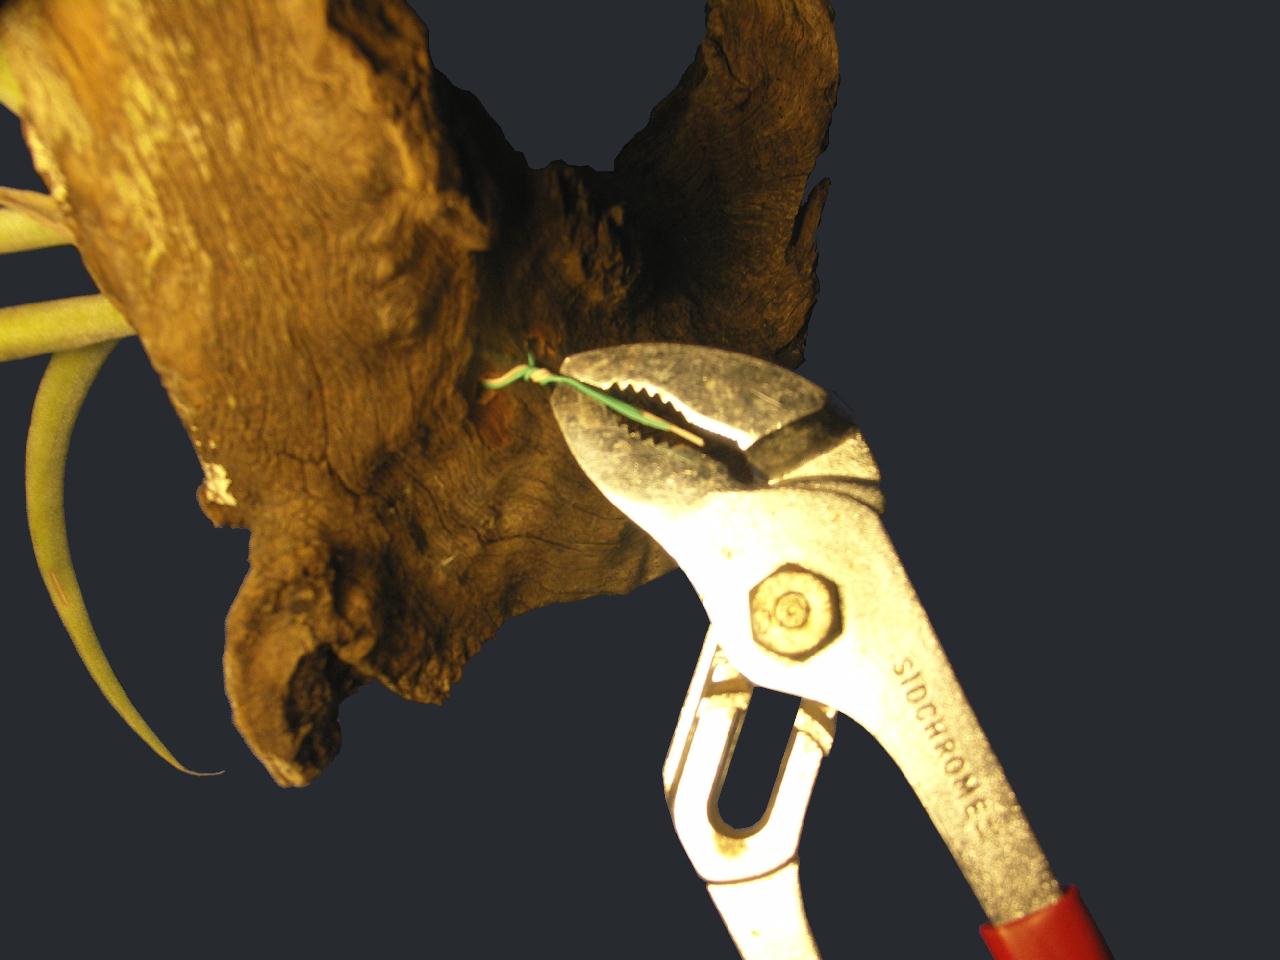
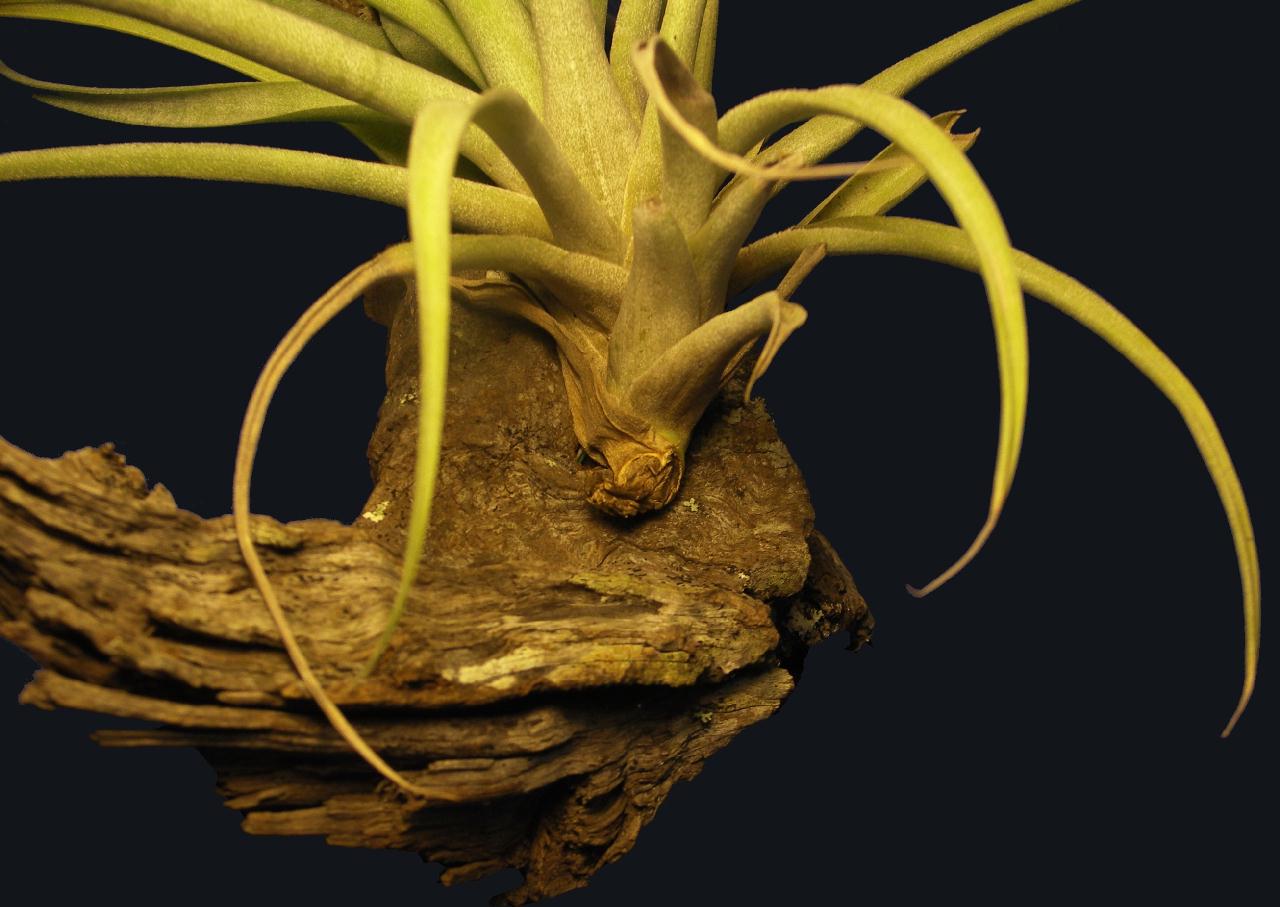
5. Once both ends of the wire poke out the rear of the mount, twist together with fingers then tighten with pliers. It is always good practice when tightening the wire with pliers to pull the wire first at the back of the mount and then twist--this may need to be repeated two or three times (Fig. 9). This allows you to feel when the plant has been tightened sufficiently without damage. If you keep twisting, it is sometimes difficult to gauge how tight the wire actually is which can easily damage and sever the plant if over tightened. Attempts to reveal little-to-no wire is desired once mounted, if correctly manipulated in and around leaf sheaths (Fig. 10).
 . .
. .  Click to enlarge.
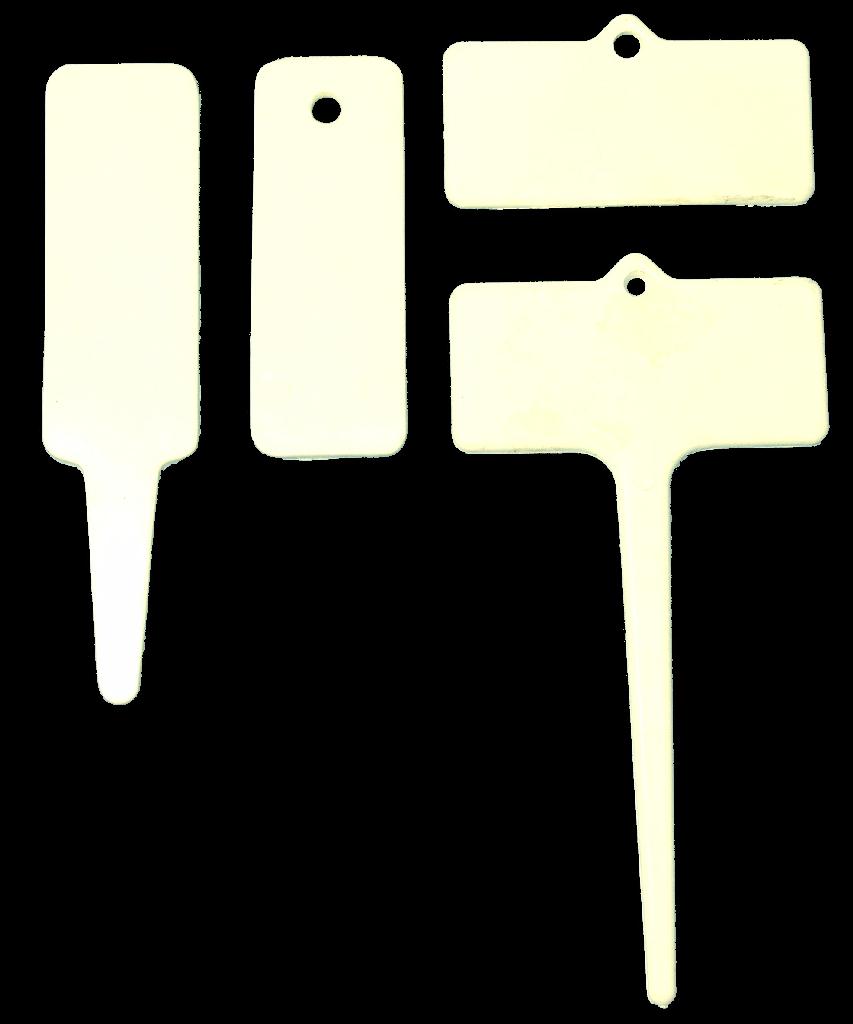
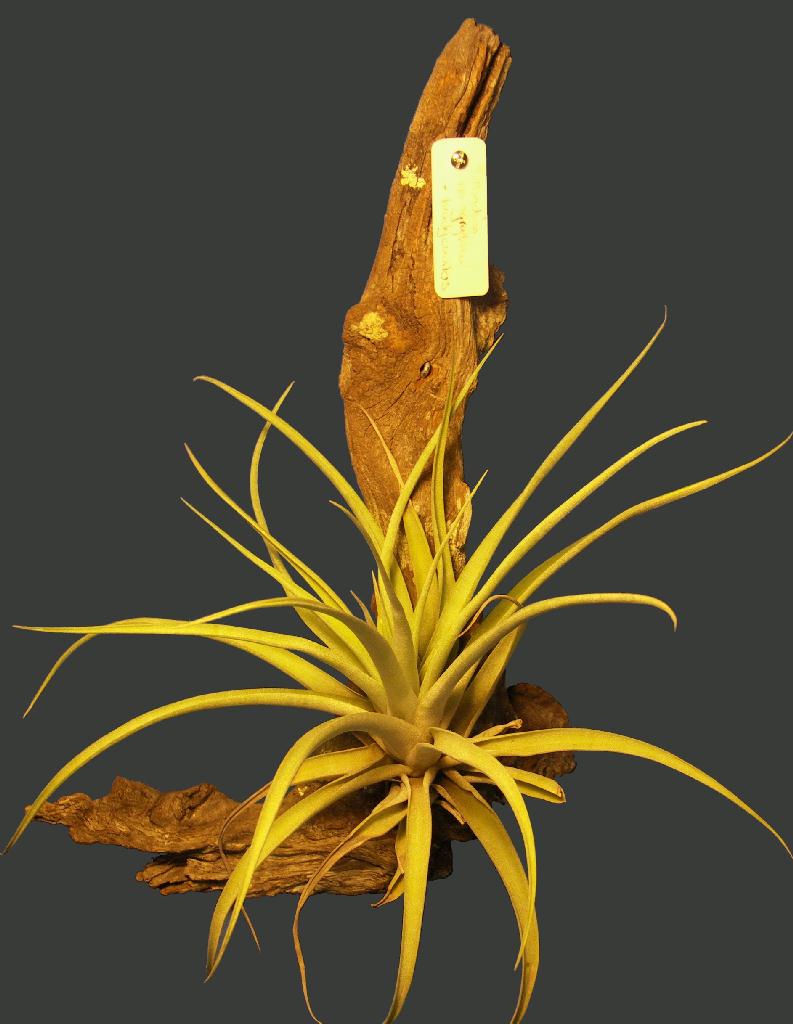
6. Don’t forget to label the plant. I prefer to insert the label at the front where I can easily read it when hanging, as opposed to having to remove the plant and mount from the wall each time I want to read the label. I use regular plant tags or orchid T-tags whereby the tapered sections are removed with the snippers and a drill hole inserted (Fig. 11). These are then screwed to the top of the mount with a stainless steel self-tapper screw (Fig. 12). I originally used thumb tacks from the local newsagency, which, when they rusted, produced leachates adversely affecting some plants-- this caused dieback of leaf tips to T. sprengeliana and rot to the apical meristem of T. gardneri which were situated directly below.
 . .
. .  Click to enlarge.
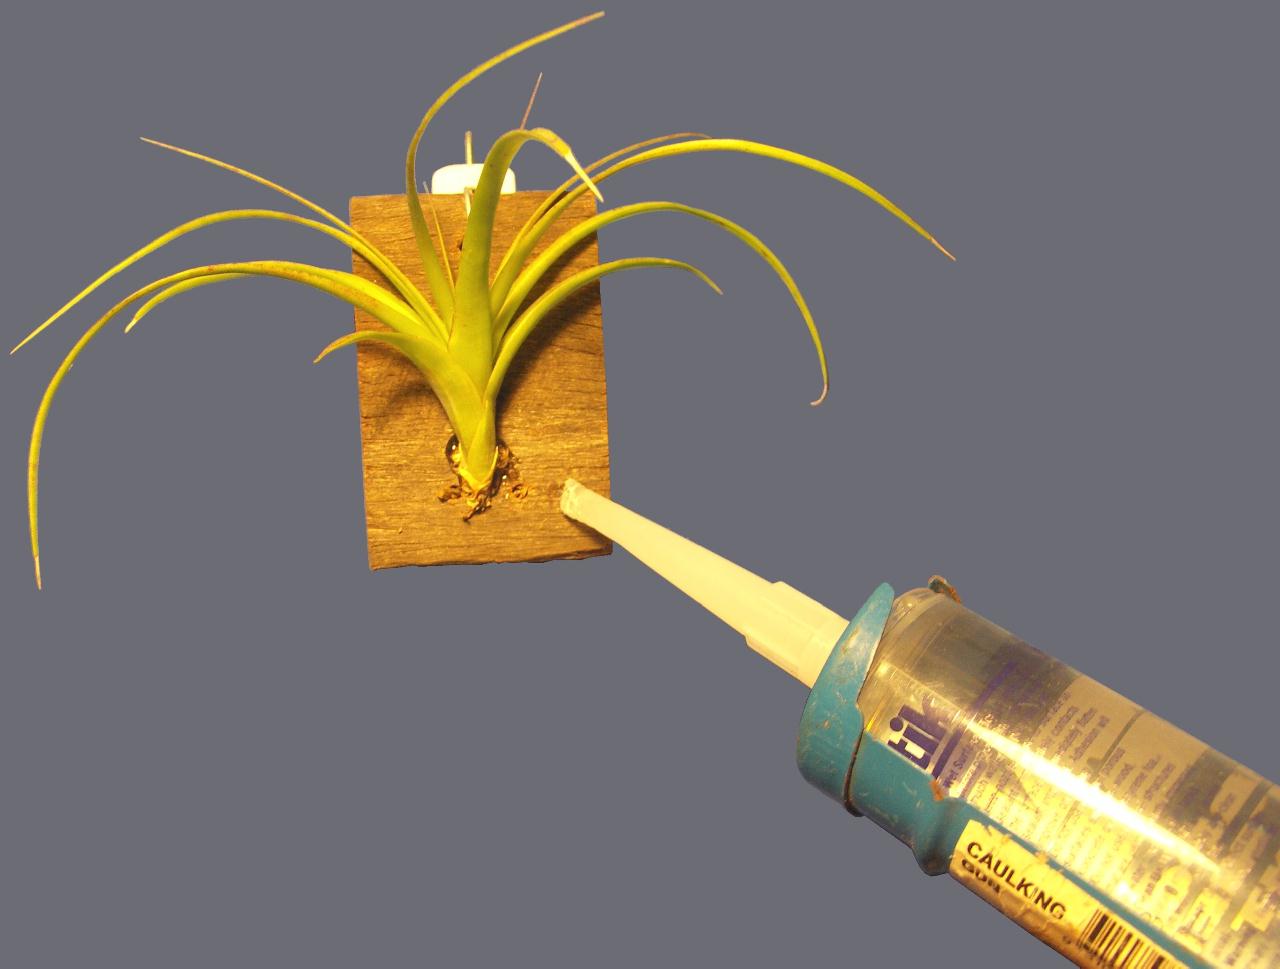
Cut up fence paling using clear sealant (non-silicon).
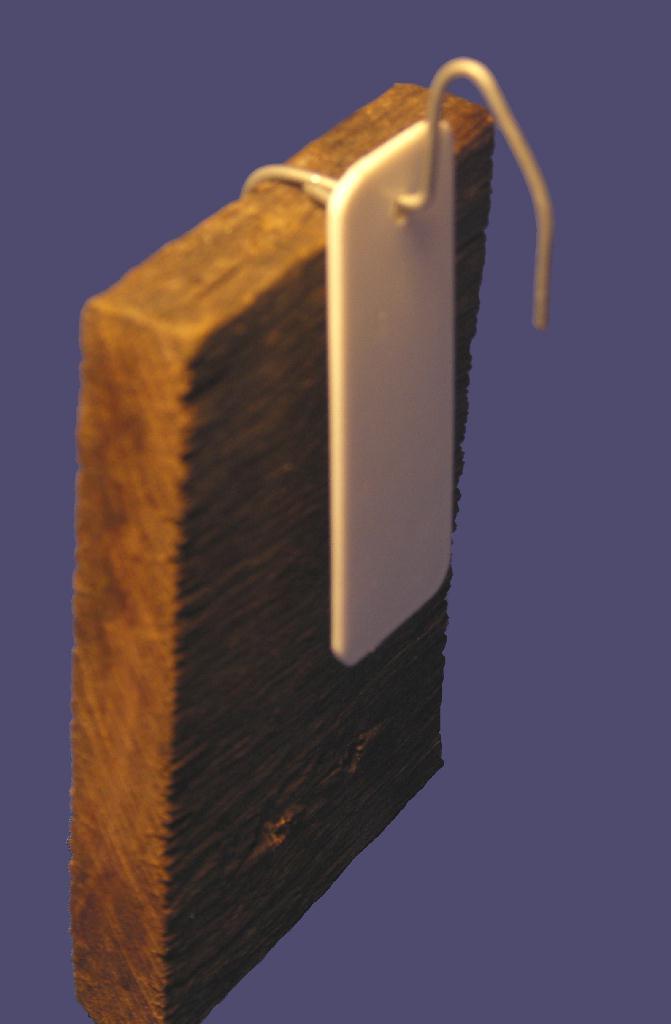
1. Drill a hole through the mount approximately 10mm from the top to support the hook. Position the hook along the medium axis so the mount hangs straight. Use a piece of 1.5mm gauge galvanised wire, approximately 100mm in length.
2. Insert through hole with approx. 30mm protruding out the front. Starting from the rear, bend the wire 90° up, then bend the front piece back to towards the rear (Fig. 13), which provides an approx. 10mm length to squeeze back around itself (Fig. 14). With a pair of pliers, bend the vertical piece back horizontally towards the rear. Leave a 5mm length and again bend the wire 90° up (Fig. 15) – this provides a space for the tag to sit without twisting and getting in the way.
 . .
. .  . .
. .  Click to enlarge.
3. Leave approx. 20mm in vertical length, bend the wire over again away from the mount at a 45° angle. The last 10mm of the wire should be bent directly downwards, which further prevents the hook from accidentally slipping off the wall if knocked (Fig. 16). Attach the tag which should sit freely with correct name applied (Fig. 17 & 18).
 . .
. .  . .
. .  Click to enlarge.
4. Once the front and back of the plant is determined, apply a sparing amount of sealant to the bottom 2/3 of the mount, along the medium axis. This should be just enough to hold the plant in place. Apply the plant base to the sealant and firmly push together to obtain good contact (Fig. 19). Let sit to dry until cured.
 Click to enlarge.