ILLAWARRA BROMELIAD SOCIETY Inc.
Club News.
Click HERE to return to Illawarra Bromeliad Society "Club News Page".
NEWSLINK
April 2007
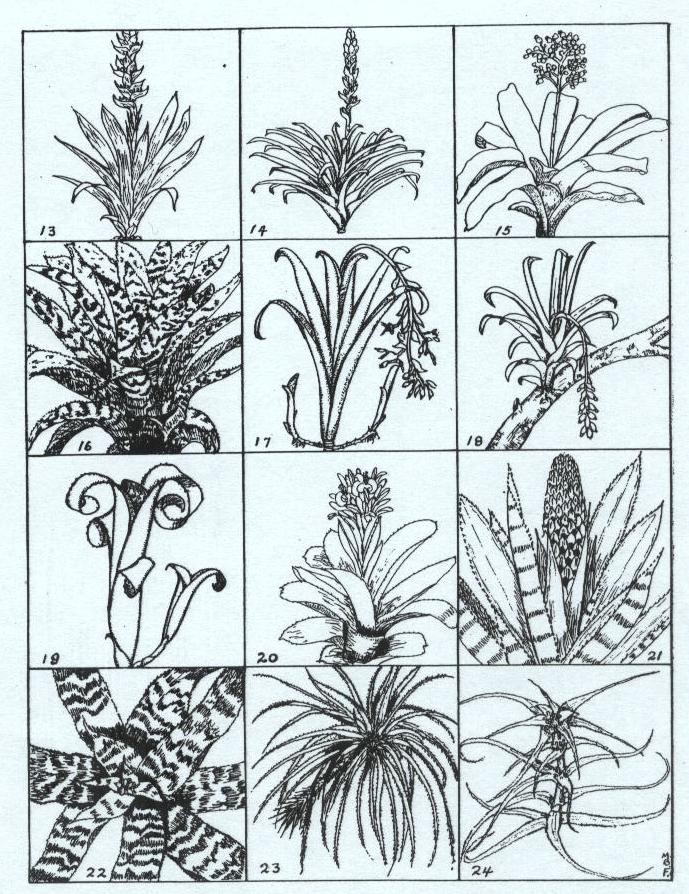
Drawings by Mulford B. Foster – From Plant Life, July-October, 1945
13. Mezobromelia capituligera; 14. Guzmania monostachia; 15. Aechmea miniata var. discolor; 16. Aechmea orlandiana; 17. Aechmea marmorata; 18. Aechmea racinae; 19. Billbergia leptopoda; 20. Billbergia pyramidalis; 21. Quesnelia quesneliana; 22. Cryptanthus zonatus; 23. Cryptanthus navioides; 24. Orthophytum foliosum
- Articles appearing in this issue of NEWSLINK are for information purposes only and are not necessarily endorsed by the Committee or the Illawarra Bromeliad Society.
- The Society is, by the holding of meetings, displays and competitions, to provide a forum for the people of the Illawarra region who are interested in the culture and collection of bromeliads.
NEW MEMBERS:
We extend a very warm welcome to our new members Neil and Tera Wheway, Dot Stephenson and Carissa Morgan. Carissa, who joined only in February, has already won places in our Monthly Plant Competition, and travels all the way up from the Batemans Bay area with her dad, Steve, and brother, Lucas. Congratulations Carissa!
MONTHLY RAFFLE PRIZE ROSTER: (2 plants/prizes from each person on the list - thanks!)
| April | Neville/Val/Sylvia/Janice Cluff |
| May | Eileen/Jenny/Laurie/Alan |
| June | Nina/Ailsa/Meri/Rena |
| July | Sharyn/Janine/Doreen Netting/Lucas |
MEMBERSHIP FEES:
A reminder that membership fees are due and payable by June 30.
VALE - ENID WHALLEY
At our March meeting we were very sad to hear that Enid Whalley had died. She was one of the founding members of our Society and during her ten years as a member she actively participated in many areas. I particularly remember Enid’s efforts as Librarian and her bright and cheery presence at our meetings.
In this Newslink I have reprinted an article written by Enid on her introduction to bromeliads which appeared in our January 1996 issue of Newslink.
VALE - GLAD COLQUHOUN
Beth has told me that dear Glad died on March 3 at the wonderful age of 95. Glad was another inaugural member when our Society began in 1992 and she remained a very active and generous member until just a couple of years ago when she moved to Yamba to be closer to family. Glad used to travel all the way from Culburra Beach (usually with Beth) to attend meetings and to help out at Shows, etc. but I can remember at least one time when she travelled by bus and by train, bringing her competition plant in her shopping trolley to help fill up the tables. She was a very keen gardener and as well as being interested in bromeliads she was also a member of the Shellharbour Orchid Society. Handcrafts were something else she enjoyed and she crocheted an exquisite shawl as a raffle prize for our Conference fund-raising efforts in 2001. Glad was also a wonderful cook and she made some delicious treats for our afternoon tea tables—remember her custard tarts?!
It is with much sadness that we say Goodbye to a very special lady!
COMING EVENTS:
| April 5 - 18 |
BROMELIAD SOCIETY OF NEW SOUTH WALES – Display and Competition at the Royal Easter Show - HOMEBUSH |
| April 21 - 22 |
COLLECTORS’ PLANT FAIR, ‘Woodgreen’, 27 Powells Road, BILPIN |
| April 21 - 22 |
BROMELIAD SOCIETY OF QUEENSLAND SHOW AND SALE OF BROMELIADS - Mt Coot-tha (Brisbane) Botanic Gardens. Further information: Bob Reilly: (07) 3870 8029 or bob.reilly@nrm.qld.gov.au |
| April 28 - 29 |
BROMELIAD SOCIETY OF NEW SOUTH WALES – AUTUMN SHOW - Concord Senior Citizens Centre, 9-11 Wellbank Street, CONCORD |
| May 5 - 6 |
BROMELIAD SOCIETY OF AUSTRALIA - AUTUMN SHOW - Burwood RSL |
| Sept 6 - 9 |
CENTRAL COAST BROMELIAD SOCIETY – SPRING SHOW – Flora Festival, KARIONG |
| Sept 8 - 9 |
ILLAWARRA BROMELIAD SOCIETY – SPRING SHOW, CORRIMAL |
| Sept 21 - 23 |
BROMELIADS 14 – BEACHSIDE, Rydges Resort Hotel, PORT MACQUARIE |
| Oct 13 - 14 |
BROMELIAD SOCIETY OF AUSTRALIA - SPRING SHOW - Burwood RSL |
| Oct 27 - 28 |
BROMELIAD SOCIETY OF NEW SOUTH WALES - SPRING SHOW - CONCORD |
| 2008 | . |
| June 24 - 30 |
‘BROMELIADS DOWNUNDER’ - The 18th World Bromeliad Conference, CAIRNS, QLD. Visit the Web Site at: www.bromeliadsdownunder.com for both the 2007 and 2008 Conferences. |
MEETINGS:
PLANT RESULTS - February 3, 2007
OPEN
| 1st | Sue Burrows |
Vriesea flammea |
| 2nd | Rena Wainwright |
XNeophytum Galactic Warrior |
| 2nd | Steve Morgan |
Vriesea Elfi |
| 2nd | Steve Morgan |
Vriesea hybrid |
| 3rd | Steve Morgan |
Nidularium Leprosa |
Novice
| 1st | Bruce Cluff |
Vriesea fosteriana Red Chestnut x |
| 2nd | Lucas Morgan |
Neoregelia Dr. Oeser Special |
| 3rd | Bruce Cluff |
Vriesea hieroglyphica |
TILLANDSIA
| 1st | Rena Wainwright |
Tillandsia leiboldiana |
| 2nd | Ted Clare |
Tillandsia streptophylla |
| 2nd | Graham Bevan |
Tillandsia capitata |
| 3rd | Ted Clare |
Tillandsia mallemontii |
PLANT RESULTS - March 3, 2007
OPEN
| 1st | Neville Wood |
Guzmania Crimson Warrior |
| 2nd | Rena Wainwright |
Guzmania lingulata var. minor |
| 2nd | Neville Wood |
Billbergia hybrid |
| 2nd | Neville Wood |
Vriesea ospinae |
| 3rd | Steve Morgan |
Nidularium procerum var. kermesianum |
NOVICE
| 1st | Lucas Morgan |
Neoregelia Dr Oeser ‘Super Clone’ |
| 2nd | Carissa Morgan |
Neoregelia Lady Leoni |
| 2nd | Bruce Cluff |
Neoregelia Predator |
| 3rd | Lucas Morgan |
Nidularium procerum var. lineatum |
| 3rd | Carissa Morgan |
Neoregelia Fosperior ‘Perfection’ |
TILLANDSIA
| 1st | Laurie Dorfer |
Tillandsia rhodocephala |
| 2nd | Ted Clare |
Tillandsia tenuifolia – red form |
| 3rd | Rena Wainwright |
Tillandsia cyanea |
SOME COMMENTS ON PLANTS BROUGHT TO OUR FEBRUARY/MARCH 2007 MEETINGS:
Vriesea ‘Elfi’/Vr. ‘Viminalis Rex’ x Vr. tesselata (Vr. tesselata now known as Vr. gigantea):
Steve brought two plants to our February meeting, labelled as above, and as I found I had a copy of an article by Derek Butcher on Vr. ‘Elfi’ I thought that I might include a couple of points:
1) Vriesea ‘Elfi’, parents ‘Viminalis Rex’ x gigantea, hybridist unknown. It has a long scape, and a large, branched inflorescence;
2) “The use of the name ‘Viminalis Rex’ suggests an origin in Europe. It is interesting to note that this name was coined by the Belgians nearly one hundred years ago to cover all vriesea hybrids at that time because their pedigrees were such a mess {Butcher, D. (2005) Vriesea ‘Elfi’ and ‘Elfi Natascha’};”
3) “The ‘Elfi’ which is a variegated form of ‘Natascha’ should be referred to as ‘Elfi Natascha’ (a ‘variegated’ chimaeric shoot from ‘Natascha’ whose parents were (‘Poelmanii x fenestralis) {See also the Samyn, G. and Thomas, E. (1997) article, Thirty Years of Bromeliad Breeding at the Research Station of Ornamental Plant Growing at Melle, Belgium, J. Brom Soc. 47(3)} to differentiate the two.” Full article at: www.fcbs.org
Neoregelia Dr. Oeser ‘Special’:
Nina commented that this is a very unstable hybrid with each generation changing!
Nidularium ‘Leprosa’:
This lovely plant came to the meeting as Nidularium ‘Sao Paulo’ (which is a cultivar of N. rutilans dating back to around 1972). The Bromeliad Cultivar Registry (BCR) describes ‘Sao Paulo’ as a “Medium rosette in spaced light green leaves mottled in the typical Nidularium manner with darker tones—large wide bracted inflorescence in rose-red with lower bracts tipped in darker tones to black.” However, on scrutiny, it was thought to be Nidularium ‘Leprosa’, which fitted well with the BCR description as a “cultivar of regelioides x rosulatum — Heavily brown spotted (hence ‘Leprosa’?) foliage—hot pink bracts.” This hybrid dates back to around 1984.
Nidularium procerum v. kermesianum:
Baensch’s book, Blooming Bromeliads, tells us that [this] “differs from the variety procerum by being smaller. The green leaves of the rosette reach lengths of only 40 cm, while those of the nominate form can be as long as
1 m. In either form the primary bracts are red. They turn yellowish orange when the small white flowers wither and the fruit assume a bluish violet colour simultaneously.
Tillandsia rhodocephala:
This is an impressively large growing plant from Mexico, quite rare in cultivation. Superficially, it resembles a giant T. capitata, with many strappy leaves, gracefully recurving in a 24-30 inch silvery rosette. The inflorescence is globose with a head of long bracts and tight branches. In nature, the inflorescence is red, hence the name which means literally ‘Red Head’.{Tropiflora Cargo Report (2004) Vol. 14 No. 3 www.tropiflora.com/creport/cr14-3/p4b.html}
LEARNING TO GROW BROMELIADS FROM SEED
By Neville Wood, Shellharbour, NSW – 2007.
When I retired I decided to take up the hobby of growing bromeliads. Like most of us, I started buying the odd plant at markets, and after a short time decided that this hobby would be less expensive if I could grow the plants from seed. Growing plants from seed has always interested me and I had grown many trees from seed for my son as a source of plants for him to bonsai. Twenty or so years ago I had also grown orchids from seed and was relieved to find that bromeliads didn’t require the stringent rules for seed-raising needed for orchids and so I started to experiment with different ways of growing them.
After a lot of failures and losses, from varying weather conditions, snails and grasshoppers, I continued to look for a “better way” of raising these seedlings. I caught the end of a Gardening Australia TV programme one night where a lady from Tasmania was explaining how she grew bromeliads from seed by just sowing the seed on wet paper towels in plastic containers. It all seemed simple enough so I decided to give it a try. Unfortunately the programme didn’t show the next stage, where the seedlings needed to be transplanted, and I wasn’t sure where to go from this “paper stage”.
This seemed to be my major stumbling block, as I managed to get the seed to germinate alright but this is where things seemed to grind to a halt. I wasn’t sure where to go from that stage, so I thought I would modify the method by growing them in the plastic containers but on a suitable growing medium rather than on the paper towels.
At this point I must emphasise that I am very much a learner, with no special skills for seed raising, and the notes here describe my attempts at seed raising and are definitely not meant to tell others how they should do it as everyone has their own conditions and their own ideas of how they should grow seedlings. However, it is only by sharing our individual ideas that we all come out winners. The method described below will definitely not suit everyone as it has been developed by trial and error to suit my growing conditions. Although at the time of writing I find I am getting good results from the method described, I will continue to try different things in the hope of further improvement.
I have found the following method suitable for acanthostachys, aechmeas, neoregelias, vrieseas and green-leafed tillandsias, but not grey-leafed tillandsias.
The Method I Use:
I use rectangular, plastic “Chinese take-away” food containers as a receptacle instead of pots when planting my seed, and they are used as they are, without any holes being placed in the bottom. These are prepared on the day I am going to sow the seed and first of all are thoroughly washed again and then well rinsed in boiling water. When finished, they are not sterile but are probably what is loosely known as ‘surgically clean’. These are referred to as “Mother Containers” and receive the seed initially. Before this is done they must first be prepared and this can be done by the following method:
1. Take sufficient moist Coco Peat to one-third fill the “Chinese take-away” food container(s).
{Note: There are different types of peat available which are suitable for the above method of growing seeds, but the one I prefer, and have had good results with, is marketed by Brunnings and called ‘Coco Peat’. It is a by-product of coir (coconut fibre) and comes in a compressed block about half the thickness of a house brick. It is inexpensive (about $2) and available from K Mart, Woolworths, Bunnings, and probably many other places. It is convenient to store and to reconstitute for use, by simply adding 4.5 litres of water. This will make approximately 9 litres of peat. This type of coir comes in varying sizes and grades, some with added fertilizer and some without, but the grade I use is the “seedling mix” grade, without added fertilizer.}
2. Place the containers in a microwave oven and cook for 5 minutes on high with the lids loosely fitted. (This will sterilize any other types of seeds which may be in the peat and stop them from germinating and thereby competing with the bromeliad seed.)
3. When finished, snap the lids shut and set the container(s) aside until cooled down and required for use.
Sowing the Seed:
With species such as aechmea, acanthostachys, neoregelia, etc., I take the seed from the seed capsule before it splits open and squeeze it directly onto the surface of the peat. I do not wash the gel-like substance from the seed as I find this doesn’t make any difference to the germination. The reason I use this method relates back to when I grew Cattleya orchids from seed. In those days when I was just starting out I was advised by a good friend, and well known hybridist in Queensland, to use seed from the “green pod” rather than “dry seed” for two reasons:
a) You didn’t have to wait for the pod to mature and burst open so you could collect the seed early, which, in the case of these orchids, saved up to three months in growing time.
b) The seed was sterile whilst in the green pod because it hadn’t been exposed to air and contaminated with fungus spores. This eliminated the step of sterilizing which had to be done with dry seed.
When the capsules are collected and ready to use I open the prepared container and squeeze the seed onto the growing medium and, at the same time, try to spread it around to separate the seeds as much as possible with the aid of a pointed pair of stainless steel forceps. Because the seed is so fine this is a painstaking job but well worth the extra effort as separating the seed at this early stage will make separating and transplanting the little seedlings much easier when the time comes.
Finally, I spray the seed with water from a small hand-pump spray such as the type used for misting indoor plants. This settles the seed snugly on top of the peat so that they are in direct contact with the moist surface. The seeds must not be covered with peat.
The containers are then covered with the lids and placed on a shelf in an east facing, closed-in porch where they are out of direct sun but are able to stay reasonably warm. Germination takes from between one and three weeks in the warmer weather and up to twice that long during the colder weather.
Thinning Out:
Initially my seed sowing was less than desirable as there was far too much seed sown and it was not separated well enough. Consequently, I found that the little seedlings were terribly overcrowded in the mother containers. I have now found that if the seed is difficult to separate and the mother container is overcrowded, it is advantageous to thin out the seedlings after first preparing extra containers in the same way as the mother container was prepared. The best time to do this is just after the green shoots appear from the ends of the seeds. With the assistance of a fine pair of stainless steel splinter forceps, the little seedlings can be gently and painstakingly separated and lifted from the mother container and re-housed on top of the peat surface of the new containers. This will facilitate easy transplanting to community pots when the time comes. This doesn’t appear to set them back at all; in fact they seem to grow quicker and stronger.
Transplanting from Mother Container to Community Pots:
Before I transplant from the mother containers into community pots I first acclimatize the little seedlings by removing the lids from the mother containers and cutting some drainage holes in the bottom with an angle grinder. The open containers are then placed in previously prepared polystyrene broccoli boxes which have been cut down to about 18 cm in height. They are prepared by placing about 5 cm of damp ‘Coco Peat’ in the bottom, onto which I then bed the bottom of the plastic food containers so they are firmly in contact with the peat. I find this helps to maintain a constant suitable humidity and moisture within the potting medium.
I find the best time to transplant into community pots is in early spring when the seedlings are large enough (with about five leaves) to be comfortably handled with a pair of fine pointed splinter forceps.
First I prepare 75 mm plastic community pots by filling them to 75% of their depth with a mix made with the following:
1 small block of Bunnings Coco Peat—seed-raising type without added fertilizer (Makes 9 litres)
1 measure of fine polystyrene grains (measure used is a 1 L plastic ice-cream container)
1 measure of propagating sand
Finally, the pots are topped up to within 4 mm of the top with finely chopped fresh sphagnum moss and then well watered (using normal town water). After the pots have drained enough young plants are gently pricked out of the Chinese food containers and are planted into the sphagnum to fill the community pots. The number of plants depends on the size of the community pot and the size of the seedlings but generally they are planted close enough so that the leaves are just touching.
When all of the pots have been planted they are moved to the polystyrene broccoli box which previously housed the mother containers. As for watering, I just use normal town water and stand the pots in it up to their rims until they are completely soaked. I do this once weekly in warm weather and bi-weekly in cooler weather. I mist-spray the plants each morning in winter, and twice daily in summer, and I find this routine meets their requirements.
Location:
After a few disasters in the shade house (I don’t have a glasshouse), I found that it was easier for watering purposes to grow my seedlings on a porch on the southern side of our house beneath the protection of a clear Lazer-Light roof. The western, northern and eastern sides are bounded by the walls of the house and the southern wall is covered with 75% shadecloth. During winter there is no overhead sunlight and in summer where there is I hang up a frame covered with shadecloth beneath the Lazer-Light to prevent any sunburn. Although in winter it is sometimes quite cold with this southerly aspect, the little plants don’t seem to mind and to this stage they are growing happily and I have only lost the occasional plant due to damping off.
Results After Two Years of Experimenting:
I have found that the results of the above method have surpassed the method I used the previous year where I planted the little seedlings directly into the same potting mix without the sphagnum topping. The sphagnum topping seems to encourage quicker rooting, with the little plants soon sending roots down through the sphagnum and into the potting mix below, with the result that this year’s plants are already as large as those planted last year.
Potting Seedlings From Community Pots to Individual Pots :
After the seedlings have been in community pots for six to twelve months they are ready to plant into individual small pots or tubes. I use the same mix as used in the community pots but without the sphagnum moss.
I decided to trial my method and mix on four different types of seedlings and the seedlings used for the trial varied in size from 1 cm (Neoregelias) to 2.5 cm (Acanthostachys). These were:
Neoregelia ‘Painted Lady’ x
Aechmea lueddemanniana
Acanthostachys strobilacea
Vriesea hieroglyphica
They were all given the same treatment and were soaked in Seasol the day before they were removed from their community pots. They were then potted into individual 30 mm tubes, watered in, and given another soak in Seasol. (I have found that when transplanting vegetable plants I have much better success using Seasol in this way. I don’t get any “transplant wilt” as I had previously and therefore no transplanting setback — so I tried it on the brom seedlings as well.)
Again they were placed on top of a bed of coir peat in a polystyrene box in the same way as the community pots had been growing. When I finally finished potting, everything looked good and the plants in their polystyrene boxes were placed on a bench in the shade house beneath 50% shadecloth. Extra protection from the sun was provided by some “Spanish moss” hanging beneath the shadecloth above the seedlings. All was going well until I found that after watering a few times, the Coco Peat became waterlogged (something I had overlooked) and to eliminate this I bored a couple of 10 mm holes in one end of each box just below the top level of the Coco Peat. I then propped up one end of the box so that it was angled slightly and the excess water could run out.
Feeding was provided with one-quarter-strength Phostrogen applied overhead to the plant and the mix every two weeks with my purpose-built, ”inexpensive” watering apparatus.
{My purpose-built, inexpensive water apparatus is simply a 1 L plastic milk bottle with very fine holes drilled in the lid to allow the water or liquid fertilizer to gently do its job without dislodging the little plants until they are fully established in the potting mix.}
After two months in the tubes I checked the progress and the results were very encouraging. A randomly selected selection of five plants from each group of seedlings showed new roots reaching down into the mix. Although the Vrieseas were clearly showing new root activity, as expected they had the least amount of root progress, as I have found they are slower growing than the other varieties in the trial. The others, however, showed good progress, with the Neoregelia roots almost three-quarters of the way to the bottom of the tubes and the Aechmeas reaching almost right to the bottom, while the Acanthostachys protruded from the bottom about 1 cm and into the bed of Coco Peat on which the tubes were sitting. I think that possibly the damp Coco Peat beneath them encourages the new roots to go seeking extra moisture, or possibly the liquid fertilizer which has drained from the tubes into the Coco Peat in the base of the box is the attraction — Who knows?
When the plants are large enough I will pot them on into my usual potting mix.
P.S.: I would be pleased to hear from any other growers trying their hand at raising broms from seed, with the object of sharing ideas. I can be contacted on (02) 4296 2713 or by writing to me at 52 Wentworth Street, Shellharbour, NSW 2529.
Addendum:
A few weeks ago Nina showed me how well her Tillandsia rauhii* seeds had taken when put onto a piece of florists’ green Oasis foam which she had placed in a shallow saucer of water and left uncovered. This she kept in her ‘plant room’ which has a high fibreglass roof and so was protected from the elements.
While the seeds seemed to germinate much more quickly (showing green in 3-4 days and racing ahead in 10 days) than those I had planted into the Chinese takeaway containers as Neville has described above, Nina found that they tended to damp off when she went to the next step of transferring them to the coir peat mix. She has said that more research is needed, but they certainly looked healthy little seedlings that I saw on the Oasis — as she says, more research!
*Tillandsia rauhii is a giant green-leafed tillandsia and Neville has mentioned in his article that his method does not work for the gray-leafed tillandsias.—Ed.
EXPERIMENTS USING UNWASHED BEACH SAND
By Daryl Ganter, Hamlyn Terrace, NSW
(From The Hunter District Bromeliad Society Inc’s February 2007 Newsletter)
This paper sets out some of the ways I have used beach sand to:
1. Stop crown rot
2. Prevent rot and promote root growth in offsets
Stopping Crown Rot:
In May 2006 I discovered some serious cases of crown rot. Five plants were affected: Billbergia ‘Hallelujah’, B. ‘Domingos Martins’ cv of vittata, B. ‘Fantasia’, Neoregelia ‘Birdrock’ and Nidularium ‘Sao Paulo’.
It was easy to see what had caused the problem. I had been enthusiastically spraying a mixture of foliar fertilizer and Clensel during April and I forgot to stop as the weather cooled. I was also giving them too much water (I had been using town water).
The affected plants had all been housed on shelves below other plants; they all received extra water and fertilizer as it dripped down from above.
The worst affected plant, the Nidularium, was beyond help. The entire centre had rotted out. Fortunately the other plants were not as bad. The three billbergias each had rot in the centre but only one or two emerging leaves were affected in each plant. Neoregelia ‘Birdrock’ had three centre leaves affected and five outer leaves intact; the core of the plant seemed to be solid.
I had read a few home remedies and occasionally someone at the Bromeliad Society had mentioned that they had used an anti-fungal mixture to cure problems similar to mine. Every remedy had used a water-based anti-fungal drench of some sort. I had often thought that adding moisture to a plant affected by a disease that develops in moist conditions was risky. It seemed to me the plant should be kept dry.
The Cleanup:
It will be no news to anyone that the muck I found inside my plants was pretty gross. Using long-handled tweezers and wads of tissues I mopped and wiped out the centre of each plant until it was dry inside. My plan was to keep the plant centre dry, so I made a mixture of unwashed, dry, sifted, beach sand and dry Captan fungicide powder:
1/2 teaspoon (1.5 g) Captan powder to 500 g beach sand
I used unwashed beach sand because of the antibacterial properties of sea salts. Some bromeliads tolerate sea mists and salt environments so I thought that the small quantity of salt in the beach sand would not affect my plants. I repotted each plant into orchid bark and poured in enough of the sand mixture to half fill the dried out vase of each plant. Because the sand mixture was dry it poured easily. I watered the bark in the pots but put no water in the vases of the plants. The plants were put into strong light and checked regularly by gingerly tugging on a centre leaf to see if the rot had continued. The vases containing the sand mixtures were kept dry.
After one month every plant was still alive and every leaf still intact. So far so good! The plants were living but I couldn’t expect any growth during winter.
In the first week of August I received a surprise. The diseased Billbergia ‘Hallelujah’ was showing the stumps of three tiny offsets, B. ‘Domingos Martins’ cv of vittata was showing five pups and B. ‘Fantasia’ also had three pups. Neoregelia ‘Birdrock’, which had been more diseased than the billbergias, showed no change. It ultimately faded and died. I left the dry sand mixture in place for another month. I rinsed it out in the last week of September. It is now November and the billbergia pups are all growing well.
Conclusions:
* My billbergias should only be grown on a top shelf regardless of available light.
* To save any plant from crown rot, the disease has to be detected before three inner leaves are lost.
* The dry sand and Captan mixture destroyed the fungal disease and kept the adult plants alive until they could reproduce.
To Prevent Rot and Promote Root Growth in Very Young Offsets:
This experiment began when our Society (Central Coast NSW Bromeliad Society) was preparing for the Flora Festival and I had asked members to grow pineapple tops for our Hawaiian themed display. A few of us had noticed that pineapple tops were slow to make roots and grow. I thought that if the base of the pineapple could be kept firm and moist without rotting it might make roots quicker.
I decided to treat the pineapple tops as if they were cuttings and not offsets. After peeling all but the top four or five leaves away I planted each fresh pineapple top in my usual orchid bark. I did not dry out the exposed base which is the recommended practice. I then eased the ‘cutting’ to one side and carefully poured in unwashed, dry beach sand. This process was repeated on the opposite side so that I had the pineapple ‘cutting’ planted in bark but with a layer of sand completely surrounding it. The pot was then watered thoroughly, but gently, so the sand would not be washed away, but the salts in the sand would be diluted.
My theory was that the sand would help hold the cutting firm while retaining a little moisture. The remaining salts in the sand would also provide some protection against fungal attack. It worked! The pineapple tops treated in this fashion developed roots up to 3 cm long in 10 days while other pineapple tops that had been dried and planted in just bark took more than a month to develop even small roots.
After that experience I began to plant all my offsets, freshly cut from the parent plant, into orchid bark with a beach sand layer around the base as described above. I find the offsets make roots faster and no rotting occurs.
WINTER PREPARATION AND PROTECTION FOR BROMELIADS:
* Wind is the biggest worry for bromeliads, particularly those grown for their foliage.
* Remove dry leaves and mulch from around the surface that can lead to the rotting off of plants. Remove dry leaves from the floor of the greenhouse to reduce pests such as scale from carrying over to Spring.
* Check the potting mix to see that it is not too decayed or broken down going into winter.
* Check that the mixture is not repelling water — watering the foliage only may leave the roots bone dry. Aechmeas have well-developed roots through which water is absorbed. Replace potting mix if necessary.
* For winter watering use a watering can to water each plant separately so that the foliage is not too wet for long periods — or soak the pot in a container of water and allow it to drain. Turn off automatic or fixed watering systems.
* Condensation dripping into the centres of tillandsias can cause them to rot.
* When plants are outside there is a difference between sitting the pot on the ground and sinking the pot in the ground. If the pot is sunk into the ground the plant will be kept warmer and more moist.
* Foliage vrieseas need more protection than those with green leaves (which need excellent air circulation).
* One theory suggests that fish emulsion fertilisers contain cold-damage inhibitors which prepare the plant to withstand the cold much better. Alternate this fertiliser with other types of fertiliser.
Note: Fish fertilisers are suitable for vrieseas but not for tillandsias.
IT’S A PLANT!
By Lynn Hudson, Cairns
(From The Bromeliad Society of Australia Inc’s BROME LETTER, January/February 2007 Vol. 45(1))
I have known David Liddle for 30 years. I knew he was ‘into‘ plants but I did not know he had a quarantine house until 2 years ago. He lives just outside Mareeba, north of Cairns. The climate is drier and more like California so we decided we should quarantine our imports with him. So began a new learning curve for the three of us.
As we unpacked our treasures I held up a plant and said, “Isn’t this a beauty?” David looked my treasure up and down and said, “It’s a plant. It has roots to hold it down and feed it and leaves for photosynthesis.” Well, slap me in the face with a dead fish — I was mortified! I continued to unpack, but very quietly! He had finally shut me up: it only took him nearly 30 years! However, he did like my beautiful plants as later he brought his good friend Gary to purchase some bromeliads and even steered him toward some real beauties.
David’s comment stuck in my mind and over the next weeks when I looked at a plant I heard those words over and over again. It made me think differently. Suddenly they were not only my ‘beauties’ — they demanded that I observe them as functional identities and treat them in a manner that would allow them to function correctly and reach their full potential. So I returned to basics — to “roots, shoots and leaves”!
Roots provide the bromeliad with stability to keep it upright for photosynthesis. For most tillandsias this is the main function of roots, whereas cryptanthus, dyckias, guzmanias, orthophytums, vrieseas and intergeneric combinations of these genera rely heavily on their roots for food. Usually working roots are white and fluffy and go brown as they age. Some are like wire: they are very strong and can cut your hands. Strangely, some of these can rupture the hard shell and again produce working fluffy roots and provide food for the plant. If a bromeliad is repotted or transplanted it will grow new roots for stability — just as it would need to do if it is disturbed in habitat.
Plants that have formed a long stem from leaf removal can be cut off anywhere along the stem, repotted and they will usually produce new roots. The plant usually alters its growing habit after such repotting, so many growers simply cut off most of the roots and repot in a deeper or larger pot to get a healthier plant.
Shoots or ‘pups’ have evolved to suit their habitat environment. Some bromeliads produce offsets on the inside of the leaf at the axis of the stem, where the leaf holds liquid nutrients to succour the new immature plants—e.g., guzmanias and vrieseas.
The stoloniferous bromeliads send out a strong runner that forms roots which attach to the ground, tree trunk or to whatever is in the pathway but they will avoid treated timber. Their offshoots form on the end of these stolons. By moving away from the parent plant these offshoots gain access to nutrients and have space to develop to maturity — e.g., most aechmeas, Billbergia pyramidalis and Neoregelia compacta. This stoloniferous habit is why aechmea offsets climb out and attach to the outside of our pots—they are just doing what comes naturally, treating the pot as a tree trunk.
Some bromeliads produce just one offset, usually from the centre of the parent plant. To balance this the parent gives large quantities of seed — e.g., Vriesea splendens and most werauhia. Bromeliads that produce an offshoot amid the top leaves are called “upper puppers”. This can happen for no apparent reason or if the plant is damaged. These are not popular with growers as to remove the offshoot the leaves around the offshoot need to be removed. If the plant is well-shaped, the aesthetic appearance of the plant can be destroyed. Nidularium and canistropsis can also be upper puppers but as the offshoots are on stolons, leaf removal, if necessary, is minimal.
Leaves are shaped to channel water and nutrients to the plant, even very narrow rounded tillandsia leaves are channelled. The main function of leaves is photosynthesis to feed the plant, to produce fruits and propagate. The green colouring in leaves is chlorophyll, necessary for photosynthesis. Leaf thicknesses, shapes, colours and markings have evolved to work with the sun in photosynthesis and depict the best growing area for each plant. Leaves have several microscopic helpers for respiration: stomata, scurf and trichomes.
Stomata on the leaf tops are like the pores on our skin and open to absorb fluid nutrients.
Scurf is a white, powdery-looking substance we can see on the leaves. It is actually small hairs that hold nutrients and moisture for the plant. Scurf can appear as strips, stripes, zigzags or spots. It rubs off easily but will re-form.
Trichomes are also hairs that give the plant a fluffy appearance. They, too, are for absorption and in arid areas they hold nutrients until the plant respires in the cool of the night — e.g., Tillandsia tectorum.
Any adverse change in the leaves can show us the plant has some problem — e.g., if the tip goes brown, the plant is usually too dry. If colour fades from the tips there could be an unwelcome foreign object in the throat. Yellowing patches that turn paper-like tell us the leaf is getting too much sun.
Barbs or thorns — why do bromeliads have these? I do not know. Maybe it is because otherwise they would be utterly perfect. On the majority of plants they do not deter the animals from eating them! When some dogs decide the bromeliad has what they want, the plant will be massacred! Vicks Vaporub is a good deterrent — put a small dab on the offending dog’s nose (not nice, a bit warm) then some on the pots or on a few sticks near your bromeliad patch.
How are bromeliads different from other plants? Firstly, bromeliad leaves have respiration features on top, whereas most plants have devices on the underside. Most plants grow from the centre, but their centres are not hollow. Remember the bromeliad leaf is the plant, damage the leaves and your plant is permanently marred.
“It’s a Plant” — sure but bromeliads are very beautiful, clever, functional identities and behind the third one you purchase is a Bromeliad Bug. Once you get a good nip you will enter a fascinating world and the more you learn, the more you realize you know nuthin!
Just a plant indeed!
ROOTS, SHOOTS AND LEAVES
By Lynn Hudson
(From Bromeliad Society of New Zealand Journal June 2005, Vol. 45(6)—reprinted and adapted from an article in the 2004 #4 issue of Bromelcairns, journal of the Cairns Bromeliad Society)
Some roots are hard, some are soft, some are fluffy, some are strong and wiry and they come in colours — black, brown, white, yellow and green. Without roots, none of us would be here — neither carnivores nor vegetarians. No roots = no plants, and hence no food for animals, insects, birds or fish.
Some of our bromeliads use their roots solely to secure themselves to a host; others use them for both stability and to feed the plant in combination with food that is taken through the leaves. A bromeliad must feel stable before it will put out a root system. It is a cycle — whether the plant is in a mix or placed on a tree or log or rock, it still has to feel secure and stable.
A bromeliad will root and flower in an empty pot provided it feels secure and gets water and food. When a plant is potted, a few thin pieces of twigs or plastic around it will prop it in place. For mounted plants a non-silicone glue, nails, strips of nylon stocking or rocks will secure it while the roots grow.
The mix must suit the plant requirements and your watering regime. Your mix must drain well. A general rule is: ‘the softer the leaf, the softer the mix’. Bromeliads love an acid mix — pine bark, needles and pine cones are ideal acid additives. Thick leaved, heavily spined plants grow easily in straight scoria or lava rock. Soft leaved plants like guzmanias and vrieseas need this softer mix plus good fertilizing as they feed through their roots. Once we have made the plant feel secure, to get good strong roots we need to encourage their growth. In a pot the plant roots reach for the sides of the pot first, so add some slow release fertilizer around the edge of the pot to encourage the roots to go there.
Fertiliser should always be evenly spread to encourage even growth. The mix or the mound needs to be watered well and kept damp.
When we pot or repot a bromeliad, it grows new roots. This is most obvious when we are growing seedlings. When the leaves of a seedling reach the sides of the pot, pot it on into a larger pot. The new mix and the new roots feed the plant and seedlings will grow faster and stronger.
Some bromeliads grow a trunk-like stem after leaf removal and the stem can be cut off, the plant repotted and it will grow new roots. Sometimes this can make the plant alter its growth habit — it will get a growth spurt, it may pup and/or it may flower. To prevent this, simply cut off most of the roots and repot it into a larger pot.
In potted plants the feeding roots are white and fluffy; treat them gently or they will break. Some vrieseas have brown, wiry roots that are so strong they can cut your hands. Sometimes when these roots are damaged or cut, they will produce white, fluffy new working roots.
Bromeliads root well in perlite: just pot the plant with the perlite attached (when new roots have developed). If a plant does not look healthy first check the throat (cup). If it is clean, check to ensure the leaves do not have any scale. Depotting the plant could reveal any gray slaters (like a wood louse), ant, mealy bugs, etc. Maybe the plant just needs some air around the roots and some new mix and fertilizer.
(Footnote: It is important to frequently spray newly potted pups with a light fertilizer and keep the potting mix constantly damp. Pups which can hold water in their cups (such as aechmea and billbergia) will usually manage to survive for months while they are making roots. Large pups will be able to hold water better than small ones, so don’t remove a pup until it is at least 1/3 the size of its parent. Soft leafed pups (such as guzmania and vriesea) usually won’t hold water unless their leaves are quite developed. Roots grow faster and better in a damp and warm mix so it’s a good idea to refrain from potting pups during winter.)
MY INTRODUCTION TO BROMELIADS
By Enid Whalley
In the sixties I was given my first bromeliad as a gift for my newly erected bush house from an Aunt and Uncle who were really friends of my parents. It flowered and multiplied over the years and was greatly admired when in bloom. I used to think it was an exotic type of cactus, with a waratah-like flower. Then in the seventies my husband Allan and myself were holidaying with our daughter and son-in-law at Charlestown. We all went for a drive around Warners Bay and dropped into a nursery that was selling bromeliads, which looked like the plant we had at home with no name. Allan filled up the car with various plants and after some consideration he decided we should grow them in the yard under the trees in clumps. Next day we all went again to the nursery, this time taking two cars and filling them to capacity. Then came time to return to Wollongong, but after we had sorted out who was having what, we found we had neglected to leave luggage space. We must have bought the most as we had to buy a trailer to bring our bounty home, including wines from a visit to the wineries. Then stay an extra day as well to get the registration plates from a very uncooperative Officer. The work had just begun as owning a trailer meant bringing in stumps, rocks, charcoal, manure, hay and such to set up the plants. Guess it all sounds familiar but we wouldn’t be without our garden to wander around in. Every time I look at the nest of Billbergia pyramidalis in one corner I think of Marj and Jack, two great old friends who gave me my first bromeliad. Now, members, having read this, write and tell us how you became interested in and acquired your first bromeliads. Eileen and Margaret would be delighted to hear from you all.*
*Eileen would still be delighted to have your story on how you got started on bromeliads to write up in our Newslink!
TAXONOMIC MNEMONIC
Repens and reptans are rooting and creeping
By runners sarmentosus is rooting and leaping,
Ascendens, adsurgens nearly upwards are shooting,
By stolons stoloniferus is running and rooting,
Descendens grows downwards, decumbens is flopping,
Erectus straight upwards, cernuum is drooping,
Procumbens, humifusus, and patens are spreading,
Diffusus in every direction is heading.
Deflexus bent downwards, reflexus bent backwards;
Inflexus bent inwards, convolutus rolled up.
Revolutus rolled backwards, involutus rolled inwards,
Secundus one-sided, calathinus with cup.
Villosus’ long soft hair is growing old;
Hirsutus’ unshaved beard is coarse and bold.
Hispidus bristly with a two-day growth;
Strigosus, hirtus, sharp and rigid both.
Silky sericeus flaunts its fine smooth hair;
Arachnoidea cobwebbed like a spider’s lair.
Ciliatus’ leaves like lids of eyes have lashes,
Fimbriatus fringy like Edwardian sashes.
Tomentosus’ thick short hair you stroke;
Velutina’s velvet on Queen Mary’s toque.
Incanus hoary white, a plant for shows;
Thick wool on lanatus longer grows.
Like baby hair pilosus short and sleek;
And here’s pubescens, downy, dense and weak,
Crinitus’ long soft hair’s in little puffs;
Barbatus is mustachioed in tufts.
Click HERE to return to Illawarra Bromeliad Society "Club News Page".
Updated 07/04/07